About Gparted
Gparted is mainly a freeware partition editor that is used graphically to manage the disk partitions. It is an acronym of GNOME Partition Editor is a GTK+ front end to GNU Parted and official it is GNOME partition editing software alongside disks. Basically, it is used for creating, resizing, moving, deleting, checking, and copying disk partitions and their file systems. Further, it is also useful to create space for the new operating systems, reorganizing disk usage, copying data and residing on hard disks, mirroring one partition with another (disk imaging). These all can be done without loss of data and thus enable you to ;
- Grow or shrink your C: drive
- Create space for new operating systems
- Attempt data rescue from lost partitions
Gparted is written in C++ and it use gtkmm to interact with GTK+. Its main motto is to keep the GUI as simple as possible and to easily comfort with the GNOME Human Interface. Further, Gparted uses libparted in order to detect and manipulate devices and partition tables as several (optional) that provide support for file systems are not included in libparted. However, these optional packages will be detected at runtime and it does not require a rebuild of Gparted. Moreover, Gparted project also provides a live operating system including Gparted and can be written to a live CD, a live USB or other media devices. It is based on Debian GNU/Linux operating system and is also available on other GNU/Linux live CDs, which include recent versions of Puupy, Knoppix and Parted Magic.
For More Info Visit :-
https://en.wikipedia.org/wiki/GParted
Key Features Of Gparted :-
Gparted helps you to easily manage your disk partitions -
- Create partition tables such as msdos or gpt.
- It can create, move, copy, resize, check, label, set new UUID and even delete partitions.
- It also enable and disable partitions flags like boot or hidden.
- Easily align partitions to mebibyte (MiB) or traditional cylinder boundaries.
- Also attempt data rescue from lost partitions.
Gparted works with the given storage devices -
- Hard disk drives for e.g SATA, IDE and SCSI.
- Flash memory devices such as solid state drives (SSD's), USB memory sticks, and Non-Volatile express devices (NVMe's).
- RAID devices like hardware RAID, motherboard BIOS RAID, and Linux software RAID.
- All sector sizes e.g devices with 512, 1024, 2048, 4096 byte sectors and more.
System Requirements Of Gparted :-
Gparted Software can be used on x86 and x86-64 based computers system which runs on Linux, Windows or Mac OS X by booting from media containing Gparted live. It require minimum of 256 MB of RAM in manner to use all of the features of the Gparted application.

Best & Effective Software For Mac Partition Manager
Software Name |
Ratings |
Download Now |
Stellar Partition Manager |
9.5 / 10 |
 |
Guide To Install Gparted Software On Your System :-
- Step 1 : At first, install supported openSUSE 11.1/11.0/10.3/10.2 from packman in manner to install Gparted software.

- Step 2 : It will download the YMP file and automatically launch the YaST package manager to add the required repositories and install Gparted on to the system with required dependencies.

- Step 3 : Click onto finish button to complete the installation process of the software successfully.

Now know How To Enable And Install Software In openSUSE Tools Repository :-
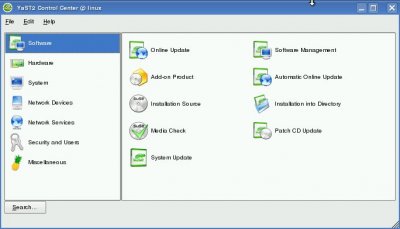
- Start computer then goto Administrator settings click “Add on Products”.
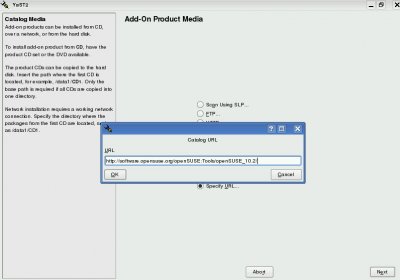
- After then select “Specify URL”and enter the URLand click OK.
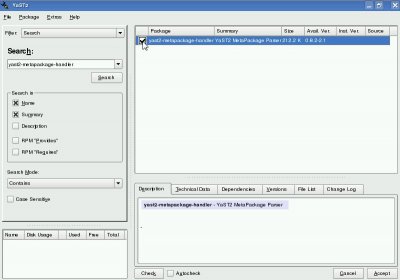
- Now search for yast2-metapackage-handler in right pane and click accept, this will lead to installed the handler.
Know How To Start GNome Partition Editor Application On Your System :-
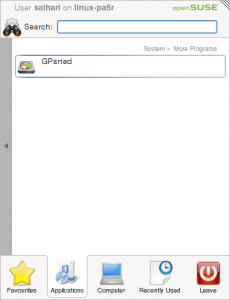
- Click on Gparted to start GNome Partition editor this will analyze the disks and provide the list of partitions and the file system to know how to partition mac drive and the free disk space that can be used.
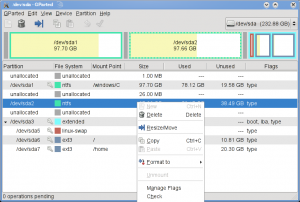
- Gparted not at all work on mounted file systems and therefore need the partitions to be resized or deleted to have the file system mounted on it unmounted.
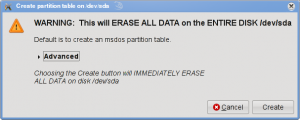
- Now create a new partition table but remember that it will destroy the data on the entire disk.
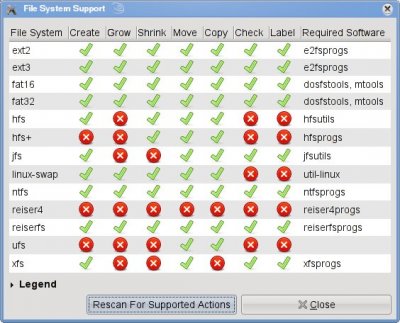
- From view section, you can see the File system support menu and can understand the level of support on the File system. It fully supports create, grow, shrink, move, copy, check, label on an EXT2 or EXT3 file system but gparted can only move or copy the UFS file system.
- Now check and repair the file system on a selected partition or resize a chosen partition. Resizing can take considerable amount of time which depends on the size of the disk and size of the partition.
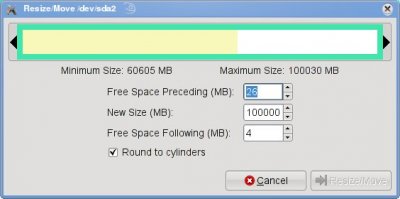
Simple Steps To know Information About Drives & Media Storage Devices :-
- Firstly, open the Gnome Partition Editor in your system.
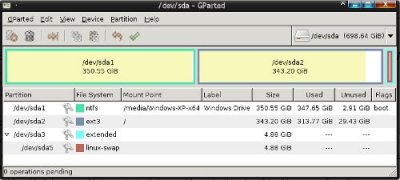
- After then select or change devices, in order to choose another from drop down menu in the top right. Then right click the partitions to choose information to get more info.
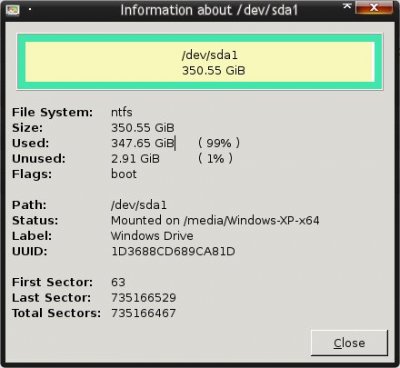
Ref :-
https://www.pcsteps.com/2494-gparted-the-best-gui-linux-partition-manager/
Another similar way to enter sudo fdisk -l in a terminal is as :-
Disk /dev/sda: 750.2 GB, 750156374016 bytes
255 heads, 63 sectors/track, 91201 cylinders
Units = cylinders of 16065 * 512 = 8225280 bytes
Disk identifier: 0x2101e331
Device Boot Start End Blocks Id System
/dev/sda1 * 1 45762 367583233+ 7 HPFS/NTFS
/dev/sda2 45763 90564 359872065 83 Linux
/dev/sda3 90565 91201 5116702+ 5 Extended
/dev/sda5 90565 91201 5116671 82 Linux swap / Solaris
Further, you can also have a look on everything that's mounted via gedit/etc/mtab (or cat/etc/mtab) if you want to see the output displayed in the terminal. It will appear something like this :
/dev/sda2 / ext3 rw,relatime,errors=remount-ro 0 0
proc /proc proc rw 0 0
none /sys sysfs rw,noexec,nosuid,nodev 0 0
none /sys/fs/fuse/connections fusectl rw 0 0
none /sys/kernel/debug debugfs rw 0 0
none /sys/kernel/security securityfs rw 0 0
udev /dev tmpfs rw,mode=0755 0 0
none /dev/pts devpts rw,noexec,nosuid,gid=5,mode=0620 0 0
none /dev/shm tmpfs rw,nosuid,nodev 0 0
none /var/run tmpfs rw,nosuid,mode=0755 0 0
none /var/lock tmpfs rw,noexec,nosuid,nodev 0 0
none /lib/init/rw tmpfs rw,nosuid,mode=0755 0 0
/dev/sda1 /media/Windows-XP-x64 fuseblk rw,nosuid,nodev,allow_other,blksize=4096 0 0
binfmt_misc /proc/sys/fs/binfmt_misc binfmt_misc rw,noexec,nosuid,nodev 0 0
Or you can also use sudo blkid (or sudo blkid -c/dev/null) if you just want drives and partitions listed :
/dev/sda1: UUID=”1D3688CD689CA81D” LABEL=”Windows Drive” TYPE=”ntfs”
/dev/sda2: UUID=”daf56d80-15b5-4314-9672-fd91d12a3bd6″ SEC_TYPE=”ext2″ TYPE=”ext3″
/dev/sda5: UUID=”241939b6-9c32-4cb8-b644-0455c4a5460f” TYPE=”swap”
Also find out mount points and drive/partition usage info with df -h :
Filesystem Size Used Avail Use% Mounted on
/dev/sda2 338G 309G 12G 97% /
udev 2.0G 400K 2.0G 1% /dev
none 2.0G 1.7M 2.0G 1% /dev/shm
none 2.0G 216K 2.0G 1% /var/run
none 2.0G 0 2.0G 0% /var/lock
none 2.0G 0 2.0G 0% /lib/init/rw
/dev/sda1 351G 343G 8.4G 98% /media/Windows-XP-x64
Know To Find Block Device File Name of Disk Drive
In case, you might come across with some commands that require the actual device name of your CD/DVD drive like /dev/dvd instead of the mount point like /media/cdrom0, then you need to know what it is as commands won't work if it is looking in the wrong place. However, there are couple of ways to do this, and thus probably find the outputs.
Method 1 :-
To find out name of the block device file representing your optical disc drive, enter the following into a terminal, without a disc in the drive:
wodim ---devices
Information will be displayed as follows :-
wodim: Overview of accessible drives (1 found) :
————————————————————————
0 dev=’/dev/scd0‘ rwrw-- : ‘ASUS’ ‘DRW-24B1ST’
————————————————————————
If there is a disc available in the tray, you will see the following error, so just eject the disc and run the command again :
wodim: No such file or directory.
Cannot open SCSI driver!
For possible targets try ‘wodim --devices’
or ‘wodim -scanbus’.
For possible transport specifiers try ‘wodim
dev=help’.
For IDE/ATAPI devices configuration,
see the file README.ATAPI.setup from
the wodim documentation.
Method 2 :-
To find out name of block device file representing your optical disc drive, as well as its mount point, then enter the following into the terminal :
mount/grep^'/dev'
Output will be displayed as :-
/dev/sda3 on / type ext4 (rw)
/dev/sda1 on /media/Windows XP type fuseblk (rw,nosuid,nodev,allow_other,blksize=4096)
/dev/sr0 on /media/cdrom0 type iso9660 (ro,noexec,nosuid,nodev,unhide,user=ozzman)
Apart From Gparted Some Other Software Used For Partition Of Mac OS
Stellar Partition Manager : Best Professional Software
Stellar Partition Manager is one of the best professional partition management utility for Mac OS. The software is build and designed especially to manage your Mac partitions that include boot camp and also optimizes hard drive performance of the system. Further, it allows you to perform basic partitioning operations like creating, deleting, re-sizing, formatting, hiding, revealing a partition. Moreover, this utility software has several unique features like shift & re-size options which enable to move the partitions and can add multiple free spaces together in manner to create a new one. In case, if there are any unused partitions in your hard drive, then you can remove it out with the help of delete or format option, and thus make room for a new partition. It also offers utmost safety and privacy of user data by its options hide and reveal. By using these options you can hide a particular volume, so that no one can access on it and can again mount it by using reveal option, however this is possible only with Stellar Partition Manager.
Key Features Of Stellar Partition Manager :-
- It very easily creates new partition(s) on Mac hard drive.
- Resizes Mac partition via optimizing the free space.
- It resets, formats or deletes the existing partitions.
- Able to performs batch operations which prevents the risk of data loss.
- It is compatible with Mac OS Sierra such as 10.12, 10.11, 10.10, 10.9, 10.8, 10.7, 10.6 etc.
- Resizes boot camp and NTFS partition with ease.
- It can also roll back your last selection.
Advantages & Disadvantages Of Stellar Partition Manager
Advantages -
- Better way is resizing then Mac OS disk utility.
Disadvantages -
- Its demo version is only for evaluation.
User Guide For Stellar Partition Manager
- Step 1 : Select volume name, size and format to add new partition.

- Step 2 : After then select a drive and click delete. You will see task is ready click start to run the task.

- Step 3 : Select drive and click format, assign task is ready to start.

- Step 4 : In this step you can add various partitioning task on the selected drive. Click start to run batch process.

- Step 5 : By using the mouse on partition edge you can trim/expand the partition of desired size. Click on start to execute the process.

- Step 6 : Select startup drive and click on continue button to proceed further.

- Step 7 : Lastly, software will prompt to choose the location. Click on create image to continue.

Paragon Rescue Kit : Free Software For Mac Partition Manager
Paragon Rescue Kit is a freeware software that allow to partition the drive of the Mac as well as Windows system. It also allows to create a bootable recovery of USB-flash drive or external hard drive in just a few clicks, which help you to take an quick action whenever a hardware malfunction or a system crash will occur. Mainly the software supports all Intel based Mac's which provide the possibility to easily and quickly back up your Mac OSX as well as Windows OS and data partitions to any media.

Features Of Paragon Rescue Kit :-
- It is a integrated set of powerful tools.
- Allows bootable recovery USB-flash drive easily and quickly.
- It allows startup of Mac when OS is corrupted.
- It is simple, easy to create and to use.
- Software is free of charge and no registration is required.
- Supports latest Mac OS Sierra.
- Also capable to recover lost or accidentally deleted partitions.
- It is an easy way to disable system Integrity Protection.
Advantages & Disadvantages Of Paragon Rescue Kit :-
Advantages -
- Great interface, easy to use.
- Browse and search the directory tree of deleted files easily.
Disadvantages -
- It not at all support obscure drives and file systems.
- Freezes a bit when recovering files.
Paragon Rescue Kit User Guide :-
- Step 1 : Install the software and then select disk and partitions from upper area.
- Step 2 : After then right click a free space block to create new partition.

- Step 3 : Mention the partition size and its position relative to beginning and end of the block.

- Step 4 : In order to store data on the created partition you need to format it to one of the supported file systems.

- Step 5 : Lastly, click OK when it is complete. All changes to the disk layout will be pended until it is confirmed.
Final Words -
Lastly, came to conclude that from above listed partition manager software for Mac OS Stellar is one of the best and effective software for the partitioning of system hard drive. It is quite popular when it comes to partitioning operations such as deleting, creating, removing, resizing and such more. However, on the basic of its features and popularity you will definitely choose Stellar Mac Partition Manager tool over its competitors.
Know How To Resize Mac Boot Volume By Using Stellar Partition Manager
- Firstly, create a bootable DVD for your Mac and then insert the DVD into the DVD drive, then restart your Mac.
- Then hold down the C key to boot from the Bootable DVD inserted.
- After then accept the license agreement to launched the software on your system.
- In your Intel-based Mac, highlight Mac hard drive to the left.
